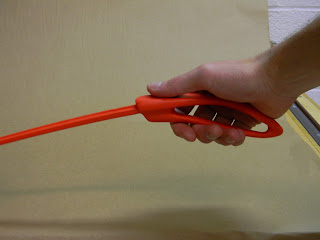
Final Flyswatter


 Final Flyswatter Handle

Year:  2013

Media:  Resin-based plastic, filler primer, "La Fonda Fireberry" acrylic paint

Specs:  The main goal of this project was to make a comfortable flyswatter handle that communicates to the user exactly how he is supposed to use it.  I chose to make the grip communicate to the user to place his thumb on top in order to keep the wrist aligned with the range of motion and prevent strain.  Subsequently, the palm is placed on top and the fingers on bottom, so appropriate curves were shaped to accommodate this grip.  The cutout in the center is intended to save material for production costs as well as to maintain the lightweight nature of the tool.  I chose to paint it a bright red color because I wanted the flyswatter to look aggressive and stand out.  This red color is seen quite often in nature, especially on bugs who wish to appear not to be messed with.  The overall appearance of this flyswatter is a modern, simple to use design that conveys aggression and comfort in handling pests at the same time.  


Final Handle Process


 Handle Process

Year:  2013

Media:  Low-density foam, high-density foam, silicone mold, resin -based plastic, lacquer-based filler primer, acrylic paint

Specs:  Because a handle is meant to be held and interacted with, 2D sketches don't suffice in making models.  Thus, three dimensional sketch models were made by carving into a cheap, low-density foam material.  These designs were refined and progressed into a better finishing high-density foam that has the same texture and properties of pumice.  When the final high density foam model was sanded and finished, it was sprayed with filler primer and sanded to smooth perfection in order to build a silicone mold around it.  The mold material was mixed and vacuumed to remove air bubbles from it and the mold was poured over the model and allowed to set for 12 hours.  Then the model was removed and a resin, plastic, casting material was mixed and poured into the empty mold to produce a finished model ready to sand, prime and paint.


Final Chair


Cardboard Chair Final

Year:  2013

Medium:  4 X 8' Sheet of Corrugated Cardboard

Specs:  My final cardboard chair utilizes the trapezoid as an intriguing shape, while also maintaining a solid structure for support.  Other shapes include triangles in the seat and back bars and various shapes that compliment the trapezoid such as in the armrest.  The seat has an ergonomic shape to compliment the curves of a seated figure.  The seat is 16 inches off the ground, slightly shorter than the standard but still comfortable.  The armrests rest 5 inches above the seat to provide for a relaxed seat and the back rest sits just a few inches above the arm rests to compliment and support the shape of the lumbar spine.  

Logo


Final Logo Design

Year:  2013

Medium:  Adobe Illustrator

Specs:  This logo derives inspiration from optical illusions, the etymology of the name Ethan (meaning strength, honor, the gift of the island), and commonalities in my design work such as intricate detailing, adding value, subtleties in concepts (a.k.a Easter Eggs), and a strong foundation built on research and reasoning for a design.  


Logo Sketches


Logo Sketches 

Year:  2013

Medium:  Adobe Illustrator

Specs:  Various digital sketches  for a personal logo design.  A personal logo is intended to convey one's design personality by means of graphic tools and text.  These sketches explore positive and negative space, the amount of visual information to make an object appear as a solid, altering perspective, and high contrast values.